
Simple drywall patch with backing strip
When patching drywall holes, it is important to use a method that keeps the patch from either pushing into or falling out of the hole you are repairing. Drywall tape applied to the surface prevents cracking and provides a strengthening barrier to keep the patch from falling out or away from the hole being repaired. But how do you keep the patch from falling or sagging too deeply into the hole? A strapped backing drywall patch is a good choice to repair holes between eight and fourteen inches wide.
A strapped backing patch gives a solid backing on which to secure your drywall patch. Anytime drywall is installed it is usually secured to either metal or wooden studs using drywall nails or screws. However, when repairing small holes in drywall, there is usually no solid backing in the area you wish to patch. The basic concept of a strapped backing patch is to first install a small strip of either wood or metal behind the area you are fixing and then install drywall in this hole. Finally you can tape and finish the patch smooth with the surrounding drywall.
How to install backing when patching drywall
You can use many different materials as backing for a drywall patch. One by two wooden strips work well. They are easy to cut and provide a solid backing. Metal studs are a good choice as well. Two by four wooden studs are too heavy and hard to work with for this type of drywall patch. Some people use paint sticks as backing straps however these are too flimsy to provide any true support.

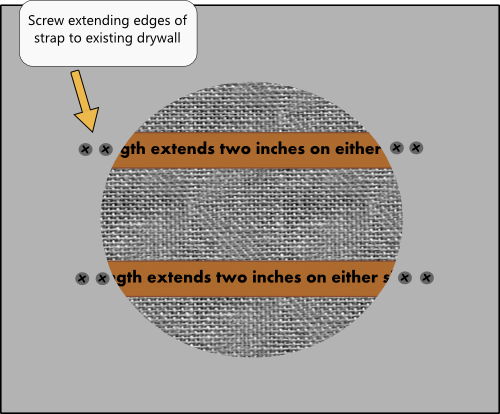
First thing to do is install your backing straps. Cut a one by two or metal stud to a length that is at least four inches longer than the width of hole you are repairing. You should to be able to slide your strapping into the hole and position it behind the hole to be repaired therefore take care not to leave the straps too long. It should extend at least two inches on either side of the hole so you are able to secure it to the existing drywall. Slide the strap into the hole and position it so that it extends evenly on both ends behind the existing drywall surrounding the hole. Be careful not to drop this piece in the wall while you are placing it into position.

Holding the strapping with one hand screw four drywall screws through the existing drywall and into the two ends of your strap where it extends behind the existing drywall. It is best to use two straps per hole. This prevents your patch from teetering on one strap. Once your strapping is in place, cut a piece of drywall to fit snugly in the hole you are repairing. The key to a smooth finished patch is to use the exact same width of drywall as the existing. For example if the existing drywall is half inch, you should use half inch. If it is five eighths you should use five eighths.
Install your drywall patch by fastening it with screws to your newly installed backing strips. At this point you can tape the seams and finish it as you would any drywall joints. When coating any patches three or four coats of finishing mud are usually needed. This is more coats than usually needed when coating new drywall seams. Several thin coats of mud are much easier to control and smooth out than a couple of thicker coats. Take your time and use more coats if necessary. Just remember to keep the final two coats very thin.