
How to Skim Drywall for Smooth Walls
What kind of mud should be used?
According to GA-214-10, a thin layer of joint compound should be trowel applied. Any type of drywall compound can be used when roll skimming. Tradesmen will many times prefer to use lightweight all purpose joint compound because it is easier to sand than "all purpose" or "topping" compound and a light sanding is required once dry. Some tradesmen however prefer to use "topping" compound because it creates a harder surface than "all purpose" mud which may reduce (though slightly) denting in the finished surface.
Step 1 - Mix the drywall mud
Mix the mud to a very thin consistency. Mud used for roll skimming is nearly the thinnest mud used for any step of the finishing process. It is thinner than taping mud. Only texture mud may be thinner depending on the type of texture applied. Water should be added to drywall joint compound gradually until the desired consistency is achieved. To test for desired consistency, tradesmen use various techniques. Some use their drywall pan to measure out water. Others watch the paddle as it spins in the bucket of mud. Once the paddle spinning creates a vortex that extends half way down the mud it is considered thin enough to roll. The goal is to have mud thin enough that can be rolled smoothly with a paint roller.

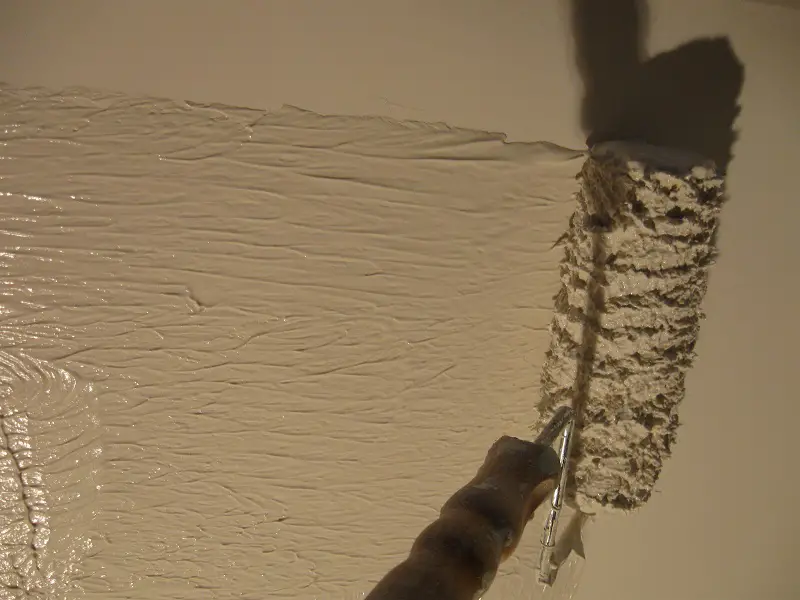
Step 2 - Roll the mud on
Using a paint roller with half inch to three quarter inch nap roller cover, dip the roller cover in your bucket of skimming mud. Roll drywall compound evenly on the surface to be skimmed. It is best to work in a section of four feet by eight feet. You don’t want the mud drying out before you have a chance to skim it off with your drywall knife.
Step 3 - Skim the surface with a large drywall knife
Using a twelve to fourteen inch drywall knife, remove as much drywall compound as you can. The drywall knife should be pulled tightly across the surface you are skimming. This is different than the technique used when coating drywall joints. The angle of your knife to the drywall surface as well as pressure used is similar to that used when coating screw heads.
You may feel that removing so much material will negate the benefit of applying a thin layer of mud to the surface. However the key to roll skimming a wall is not leaving excess mud on the surface. Excess mud would require much sanding. It is not as if you are floating the entire surface being skimmed. Rather, roll skimming works mud into the pores of the drywall paper making the "field" of similar consistency to that of seams, joints and screw heads.
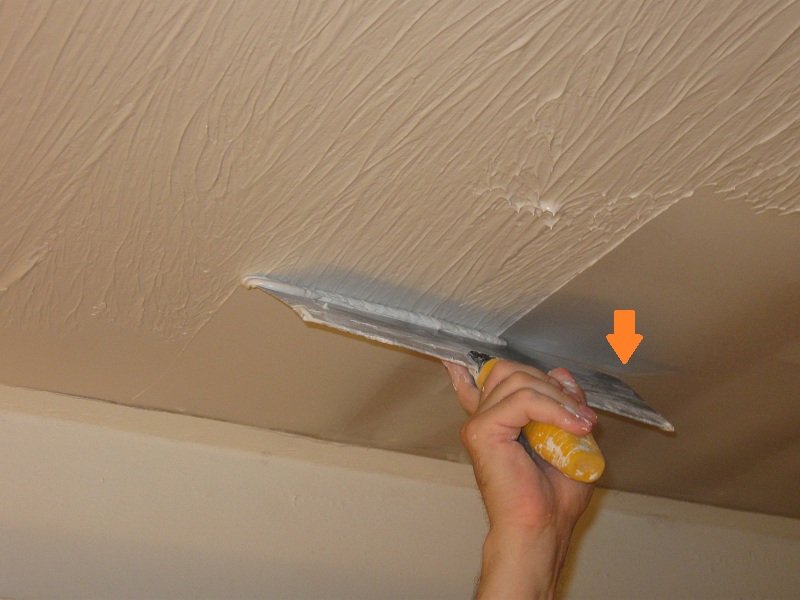
The angle to hold the drywall knife is important.
Notice in the picture below the angle of the knife as it pulls mud from the surface. A high angle in relation to the drywall surface will remove more mud, leaving behind only a very thin layer. Also notice the arrow pointing to the left side of the knife. This side of the knife is not touching the surface. The knife is bent gently with pressure applied to the right side of the knife therefore slightly floating the edge of the mud so as not to leave tool marks.
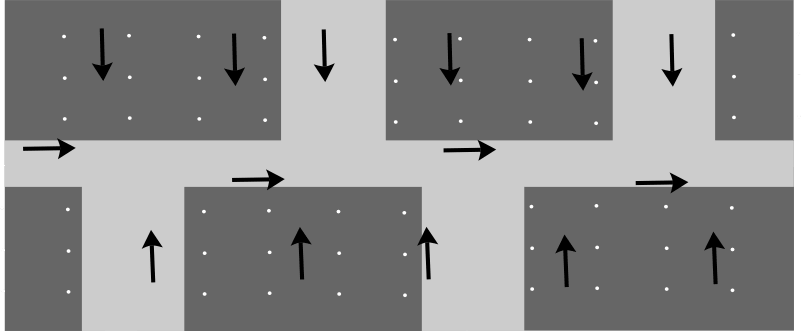
Direction to pull the drywall knife
Also important is the direction that you pull the mud when skimming. Mud should be pulled in two different directions. The "field" (where screw heads are coated and the majority of area is simply drywall paper) should be pulled perpendicular to the seams and incidentally parallel with butt joints (joints where two cut edges meet). Rolled mud on seams (joints where two bound edges meet) should be pulled in the same direction that they run along a sheet of drywall.
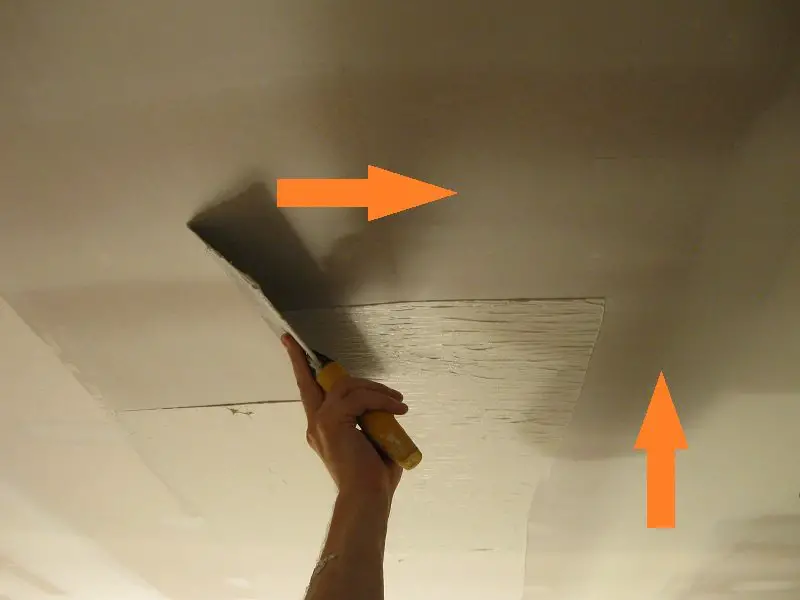
Notice the two pictures below. The diagram illustrates the concept while the photo demonstrates how the seam was pulled in one direction and currently the field is being pulled into where the seam was just finished.
Step 4 - Allow to dry and sand lightly
Once dry, a light sanding is necessary to remove any minor imperfections. A halogen light with minimum 500 watts power aimed along the surface is necessary to see any imperfections that were not covered by roll skimming. A light brushing using 150 grit sandpaper on a sanding poll is usually sufficient. If too much material was left when skimming it can require more sanding due to a greater possibility of imperfections in thicker mud. This is also why tightly skimming the surface is important in step 3.
Whenever sanding smooth walls it is important to use a halogen light with a 500 watt bulb aimed along the surface being sanded. Pointing the light along the wall will allow you to see more of the imperfections than if the light is pointed directly at the wall.
A few comments about a level 5 finish
The term level five finish is used in the interior finishes industry when referring to smooth wall finishes. Though the term level five refers not to the finished product so much as it outlines the processes required by architects when designing a particular project, it has become more of a buzz word indicating the desired quality of smooth wall finishes. The aim of the processes outlined in level 5 is to create the smoothest of smooth wall finishes. For more information about levels 0 through 5 you can read this article from the Gypsum Association’s online library.
The fifth level of a level five finish requires similar processes as those outlined in levels 1 through 4 yet also requires skimming the entire surface with a thin layer of drywall mud. For more information on why a skim coat is necessary, you can read this article that explains more about level five finishes. The article below focuses on how to roll skim drywall.
Conclusion
Roll skimming is necessary to create very smooth walls. The taping and coating processes are also important to allow for a flat wall. If the seams are too humped out or caved in even roll skimming will not be able to correct these flaws.